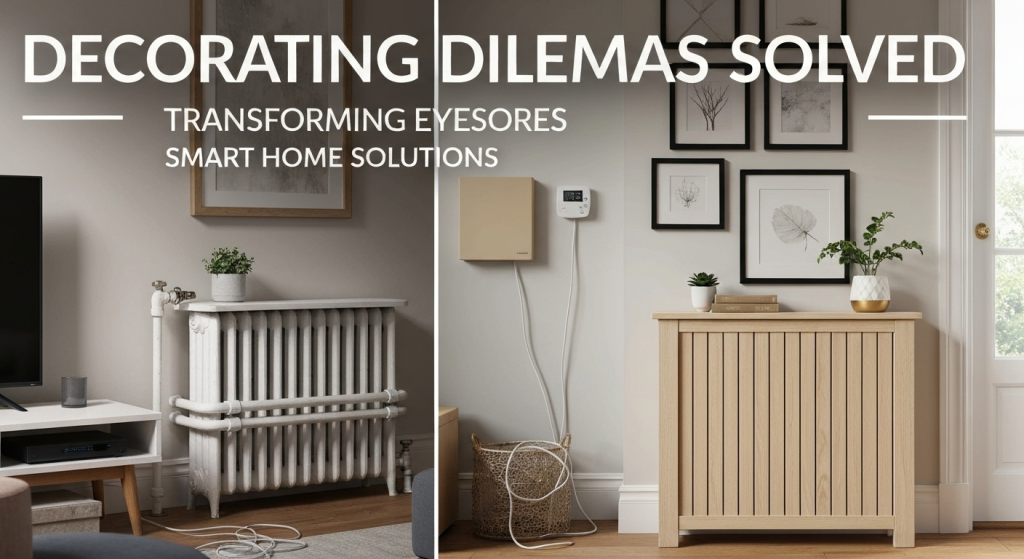
Every home has them. Those awkward, unattractive, but absolutely essential features that stick out like a sore thumb. It might be the clunky radiator that messes up your furniture layout, the wall-mounted air conditioner that ruins your gallery wall dreams, or the beige thermostat placed squarely in the middle of your favorite accent wall. It’s easy to feel like these eyesores have won, forcing you to design around them instead of creating the space you truly want. But what if you could make them work for you?
This guide is about taking back control. We will break down how to tackle these common design challenges head-on. Instead of just tolerating these necessary evils, you can learn to cleverly camouflage them until they virtually disappear or, even better, integrate them into your decor so they look like an intentional, stylish choice. It’s not about expensive renovations; it’s about smart, creative solutions that transform frustration into a feature you can be proud of.
My name is William Johnson, and for years, I’ve been diving deep into the world of home decor, driven by a passion for understanding how people can make their spaces truly feel like their own. My work isn’t about chasing fleeting trends; it’s about exploring the practical and creative ways we can solve real-world decorating problems. Through years of writing and hands-on projects, I’ve learned that the most satisfying transformations often come from tackling these exact kinds of challenges. Sharing these insights is my way of helping others turn a house they live in into a home they love.
The Two Core Strategies: Camouflage or Integrate
Before we jump into specific fixes, let’s understand the two main approaches you can take. Your choice will depend on the feature itself, your personal style, and how much effort you want to put in.
- Camouflage (The Art of Hiding): This strategy is all about making the feature blend in and disappear. The goal is to trick the eye into looking right past it. This is perfect for items you find truly unsightly and that don’t have any potential to become a positive focal point. Think radiator covers, painted vents, and hidden panels.
- Integrate (The Art of Embracing): Sometimes, you can’t hide something, so you lean into it. This strategy involves making the unattractive feature a deliberate part of your design. By drawing attention to it in a stylish way, you turn a flaw into a feature. This works well for things like exposed pipes in an industrial-style loft or a thermostat incorporated into a gallery wall.
Knowing which path you want to take is the first step in solving your design dilemma. Now, let’s tackle these problem spots one by one.
Taming the Radiator: From Eyesore to Asset
Old-school cast-iron radiators have a certain charm, but the more modern, utilitarian versions can be a real headache. They are often bulky, awkwardly placed, and can dictate your entire furniture arrangement. Here’s how to deal with them.
The Camouflage Route: Radiator Covers
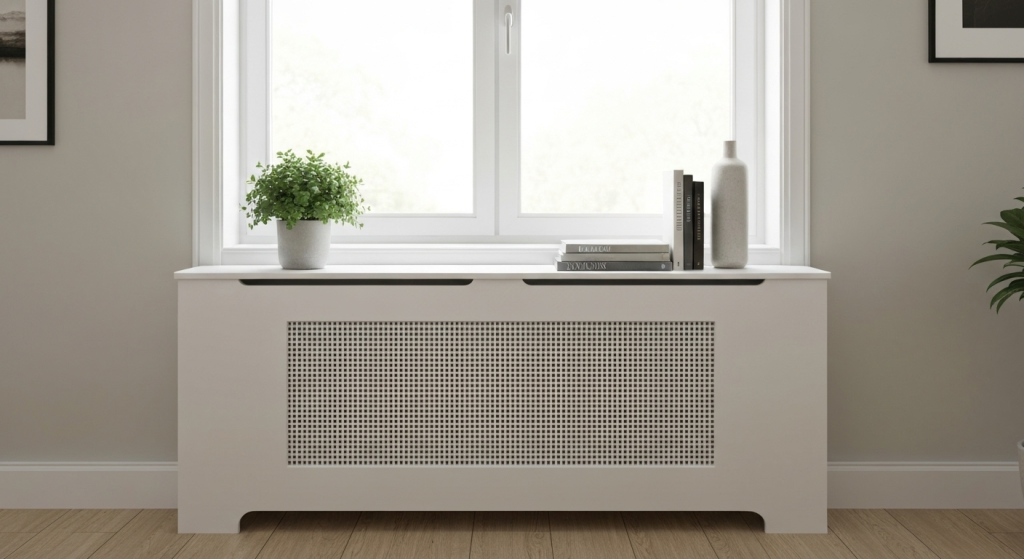
A radiator cover is the most popular and effective way to hide a clunky unit. It’s a box-like structure, typically made of wood or MDF with a grated screen, that fits right over the radiator.
A well-designed cover does more than just hide the radiator; it gives you back usable space. The top surface becomes a functional shelf, perfect for an entryway console table, a spot for books in a living room, or a display ledge for photos and plants. I’ve often used this trick in smaller apartments where every square inch counts. A slim radiator cover in a hallway instantly creates a landing strip for keys and mail where none existed before.
However, safety and efficiency are critical. The cover must have proper ventilation to allow heat to circulate freely into the room. Most ready-made covers have grilles on the front, but the best designs are also open at the bottom and top to encourage natural heat convection. Without proper airflow, you’ll just be heating the inside of a box, wasting energy and money.
| Feature | DIY Radiator Cover | Custom-Built Cover |
| Cost | Low to moderate. You only pay for materials like MDF, grilles, and paint. | High. You are paying for a professional’s time, materials, and expertise. |
| Customization | Fully customizable. You can build it to the exact size, style, and finish you need. | Highly customizable, but limited by the builder’s offerings. |
| Skill Level | Intermediate. Requires basic carpentry skills, tools, and careful measurements. | None. The professional handles everything from measurement to installation. |
| Time | A weekend project, depending on complexity and your skill level. | Minimal. Just the time for consultation and installation. |
The Integration Route: Paint and Purpose
If a cover isn’t right for your space or budget, your next best option is to integrate the radiator into your decor using paint.
- Blend It In: The simplest trick is to paint the radiator the exact same color and finish as the wall behind it. This works wonders to make it recede visually. The eye will no longer stop at the radiator but will travel across the whole wall, making the unit feel less prominent. For this to work, you must use a specialized heat-resistant paint designed for metal and radiators.
- Make It a Feature: For a bolder, more intentional look, paint the radiator a striking accent color. In a neutral room, a radiator painted in a deep navy, a vibrant yellow, or a classic black can become a quirky, industrial-chic focal point. This approach says, “Yes, there’s a radiator here, and I made it look cool.”
- Use the Space Above: Don’t let the wall space above the radiator go to waste. Hanging a large piece of art or a mirror a safe distance above it can draw the eye upward, away from the unit. You can also install a set of floating shelves above it to create a dedicated display area. This frames the radiator, making it feel more like part of a planned vignette.
Dealing with the Wall-Mounted Air Conditioner
Wall-mounted AC units, especially the ductless mini-split kind, are wonderfully efficient but can be a design nightmare. They are often large, plastic, and placed high on the wall in the most visible spot. Hiding them is tricky because you absolutely cannot block the airflow or the remote sensor.
Concealment Solutions that Breathe
The key to covering an AC unit is to use a structure that is more of a decorative screen than a solid box. It must allow air to flow in from the top and out from the front and bottom.
- A Decorative Slatted Box: You can build a simple, three-sided wooden box with slatted front and bottom panels to place around the unit. Think of it like a chic wooden cage. This disguises the plastic shell while allowing for full functionality. Be sure to build it so it can be easily lifted off for maintenance.
- Custom Cabinetry: For a more built-in look, you can incorporate the AC unit into a larger piece of cabinetry, like a bookshelf or entertainment center. A section with a louvered or decorative grille door can hide the unit perfectly. In one home office project, we built a floor-to-ceiling bookshelf unit and left a perfectly sized “cubby” for the mini-split, which made it look like a planned part of the system.
- Hinged Art (For Off-Season): If you only use the AC for a few months a year, a great trick is to hang a large, lightweight canvas painting over it on hinges. During the colder months, the art completely hides the unit. When you need to turn it on, you just swing the artwork up and out of the way.
| Pros of Covering an AC Unit | Cons of Covering an AC Unit |
| Aesthetic Improvement: Hides the unattractive plastic casing and helps it blend with your decor. | Potential for Reduced Efficiency: If not designed correctly, a cover can obstruct airflow, making the unit work harder. |
| More Cohesive Design: Allows you to create a seamless look without a bulky white box interrupting your wall. | Access for Maintenance: The cover must be easily removable for cleaning filters and professional servicing. |
| Creative Opportunity: Building or choosing a cover can be a fun design project in itself. | Cost and Effort: A good, safe cover requires either a financial investment or significant DIY effort. |
Integrating with Shelving and Art
If a full cover seems too complicated, you can use surrounding elements to minimize the AC’s visual impact. Building floating shelves around the unit can help frame it and make it part of a larger, more interesting composition. By placing books, plants, and decor on the shelves, you give the eye plenty of other things to focus on, and the AC unit becomes just another element on the wall rather than the main event.
The Small but Mighty Problem: Thermostats and Switch Plates
They are small, but their placement can be maddening. A standard thermostat or a bank of light switches can break up a clean wall, interfere with wallpaper patterns, and generally be an annoyance.
The Gallery Wall Trick
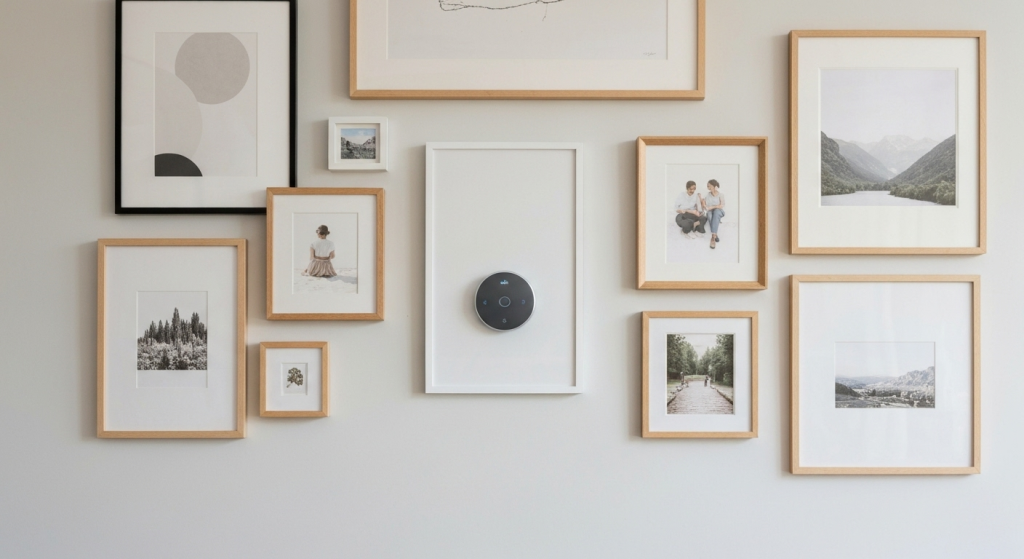
This is my favorite solution for thermostats because it’s so effective and creative. Instead of trying to hide the thermostat, you absorb it into a larger collection of art and photos.
Here’s how to do it right:
- Don’t Center It: The key is to not make the thermostat the center of the arrangement. Treat it as just one more piece in the collection.
- Vary Shapes and Sizes: Gather a variety of frames in different sizes, shapes, and orientations. This creates a dynamic, organic layout that feels curated.
- Balance the Layout: Place a frame of a similar size and visual weight on the opposite side of the arrangement to balance out the thermostat.
- Map It Out First: Before you hammer a single nail, lay out all your frames (with a paper cutout representing the thermostat) on the floor. Play with the arrangement until it feels balanced and natural.
The result is a beautiful gallery wall where the thermostat simply fades into the background, becoming part of the overall texture and composition of the display.
Upgrade and Coordinate
Sometimes the problem isn’t the existence of the switch or thermostat, but its cheap appearance.
- Swap the Plates: Ditch the standard-issue plastic plates. You can find switch plates and outlet covers in beautiful materials like brass, aged bronze, wood, or matte black. Matching these to other hardware in your room, like cabinet pulls or light fixtures, creates a polished, high-end look.
- Paint for Invisibility: For the ultimate camouflage, you can paint the cover plates to match your wall color. Lightly sand the plastic plate to give the paint something to grip, use a good primer, and then apply a few coats of your wall paint.
- Invest in a Smart Thermostat: Many modern smart thermostats (like the Nest or Ecobee) have a sleek, minimalist design. Upgrading to one of these can turn a plastic eyesore into a cool, techy feature that actually enhances your wall.
Handling Exposed Pipes and Wiring
In basements, lofts, and older homes, exposed pipes and conduits are common. Likewise, the tangle of wires from your TV and router can create a mess that undermines an otherwise tidy space.
Creative Concealment for Pipes
If you have pipes running along a wall or ceiling, you have a few great options.
- Paint Them Out: Just like with radiators, painting pipes the same color as the surface they are on is the fastest way to make them disappear.
- Wrap Them: For a more stylistic approach, you can wrap pipes in natural jute or manila rope. This is a fantastic solution for adding a rustic, nautical, or bohemian touch to a space. It turns an industrial element into a decorative one.
- Box Them In: For a cleaner, more finished look, you can hide pipes by building a simple three-sided box, or soffit, around them using drywall or wood. This is more labor-intensive but offers the most seamless result.
Taming the Wire Jungle
Visible cords are a universal problem. Here’s a quick-hit list of solutions for keeping them under control.
- Cord Covers/Raceways: These plastic channels stick to your wall or baseboard and hide the cords inside. They are inexpensive and, most importantly, paintable. Paint them the same color as your wall, and they become nearly invisible.
- Decorative Boxes: Hide bulky power strips and routers inside stylish woven baskets or decorative wooden boxes. You can easily cut a hole in the back for the main cords to run out.
- Smart Furniture Choices: Look for media consoles and desks that have built-in cable management features, like cutouts in the back panel and channels to route wires.
What About Fuse Boxes and Air Vents?
These last two are all about access. You can disguise them, but you must never permanently block them.
Disguising the Electrical Panel
An electrical panel or fuse box is often a gray metal door in the most inconvenient spot, like a kitchen or hallway.
A Critical Safety Note: You must always be able to access your electrical panel instantly in an emergency. Never place heavy furniture in front of it or cover it in a way that requires tools to open.
Here are safe ways to hide it:
- Hinged Artwork: The best solution is to hang a piece of art or a framed corkboard over the panel using hinges on one side. It looks like a normal piece of wall decor but can be swung open easily.
- Shallow Cabinet: A shallow, doorless cabinet or a decorative chalkboard can also be mounted on hinges to cover the box.
- Paint It: As always, painting the metal door the same color as the wall is a simple and effective fix that makes it much less noticeable.
Making Air Vents Vanish
Return air vents are often large, grated, and not very pretty.
- Paint to Match: The easiest fix is to paint the vent cover to match the surface it’s on—the wall, ceiling, or even the baseboard. This helps it blend in seamlessly. Remove the cover before painting for a clean finish.
- Upgrade the Cover: You can find a huge variety of decorative vent covers online, made from wood, metal, and resin in countless patterns. From modern geometric designs to ornate historical reproductions, swapping out the standard stamped-metal vent for a designer one can elevate the entire look of your room.
FAQs: Your Quick Questions Answered
Is it safe to paint a radiator?
Yes, it is perfectly safe as long as you use the right paint. You must use a heat-resistant paint specifically formulated for metal radiators. Regular wall paint will peel, chip, and may release fumes when the radiator heats up.
Will covering my AC unit make it less efficient?
It can, if you don’t do it correctly. Any cover must have ample ventilation on the front, bottom, and top to allow for unrestricted airflow. If the unit has to work harder to pull in and push out air, its efficiency will drop, and your energy bills could rise.
How can I hang art over a fuse box safely?
The key is using hinges. Mount the artwork or frame to the wall with hinges on one side and a simple clasp or magnet on the other. This ensures it functions like a door, providing immediate, unobstructed access without having to take anything down.
What’s the easiest, no-tools-required fix for an ugly thermostat?
The gallery wall is the easiest creative fix. But for a pure “blending” solution, you can often find vinyl “skins” or covers online that are designed to stick onto your thermostat model. You can get them in different colors or even patterns that match your wallpaper.
Conclusion: Turning Flaws into Features
Those awkward but necessary home features don’t have to be a source of daily frustration. Whether you choose to make them disappear with clever camouflage or transform them into an interesting detail, the power is in your hands. The most well-designed homes aren’t the ones that are perfect from the start; they are the ones where the inhabitants have thoughtfully and creatively solved these exact kinds of problems.
So, take a fresh look at that radiator, thermostat, or air conditioner. See it not as a flaw, but as a creative opportunity waiting to happen. With a little planning and a touch of ingenuity, you can turn any eyesore into an integrated part of your beautiful home.