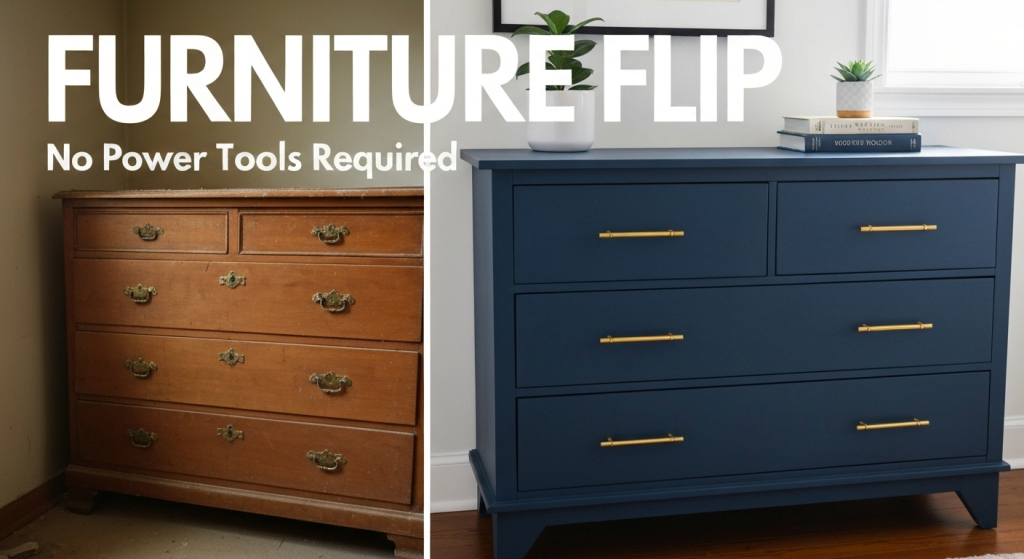
That old wooden dresser in the corner. You know the one. It’s built like a tank, the drawers slide perfectly, but its dark, dated finish screams of another era. You’ve thought about replacing it, but new furniture is expensive, and it feels wasteful to throw out something so sturdy. What if you could give it a complete, modern makeover yourself, without buying a single power tool? That’s exactly what we’re going to explore. Upcycling ideas are about more than just a coat of paint; they’re about unlocking the hidden potential in old furniture, saving money, and creating a piece that’s uniquely yours.
My name is William Johnson. For years, I’ve been fascinated by how a few simple changes can completely transform a room. This passion has led me to explore countless home decor projects, and I’ve learned that the most rewarding ones often involve breathing new life into forgotten items. Through my work, I aim to share the practical knowledge I’ve gathered, breaking down projects so they feel achievable for everyone. There’s a special kind of satisfaction in looking at a beautiful piece of furniture and knowing you made it happen with your own two hands.
Why Bother Upcycling? It’s More Than Just a Trend
Before we grab our paintbrushes, let’s talk about why upcycling is such a powerful choice. It’s easy to see it as just a crafty hobby, but the benefits run much deeper. For me, it’s a philosophy built on practicality and creativity.
- Massive Cost Savings: This is the most obvious benefit. A solid wood dresser can cost hundreds, if not thousands, of dollars new. The supplies for an upcycling project—paint, new knobs, and some sandpaper—might only set you back $50 to $100. You get the quality of old-world craftsmanship at a fraction of the price.
- Unbeatable Uniqueness: When you buy furniture from a big-box store, you’re buying something that thousands of other people own. When you upcycle, you create a one-of-a-kind piece. You choose the exact color, the perfect hardware, and the final look. Your upcycled furniture tells a story and reflects your personal style.
- A Win for the Environment: Every piece of furniture you save from the landfill is a small victory for the planet. It reduces waste and decreases the demand for new resources. This sustainable approach to decorating feels good and makes a real difference.
- The Joy of Creation: There is an immense sense of pride that comes from transforming something old and unwanted into something beautiful and functional. It’s a rewarding process that allows you to be creative and learn new, simple skills.
Getting Started: Your Pre-Project Checklist
Success in any DIY project starts with good preparation. Rushing in is the quickest way to get frustrated. Let’s walk through the essential steps to take before you open a can of paint. This groundwork ensures a smooth process and a professional-looking result.
Choosing the Right Candidate
Not all old furniture is a good fit for upcycling. The goal is to find a piece with “good bones.” Here’s what to look for:
- Solid Construction: Look for pieces made from solid wood rather than particleboard or MDF. Solid wood is more durable, easier to sand, and holds paint much better. A quick way to check is by its weight; solid wood is heavy.
- Good Condition: Check for major damage. Minor scratches and dings are fine and can be filled, but avoid pieces with deep cracks, severe water damage (which can cause warping), or broken structural parts.
- Functionality: Make sure all the parts work. Do the drawers slide smoothly? Do the cabinet doors close properly? These issues can sometimes be fixed, but for a beginner, it’s best to start with a piece that is already fully functional.
- A Simple Shape: For your first project, a piece with clean lines and flat surfaces, like a simple dresser or a basic side table, will be much easier to work on than something with intricate carvings or lots of spindles.
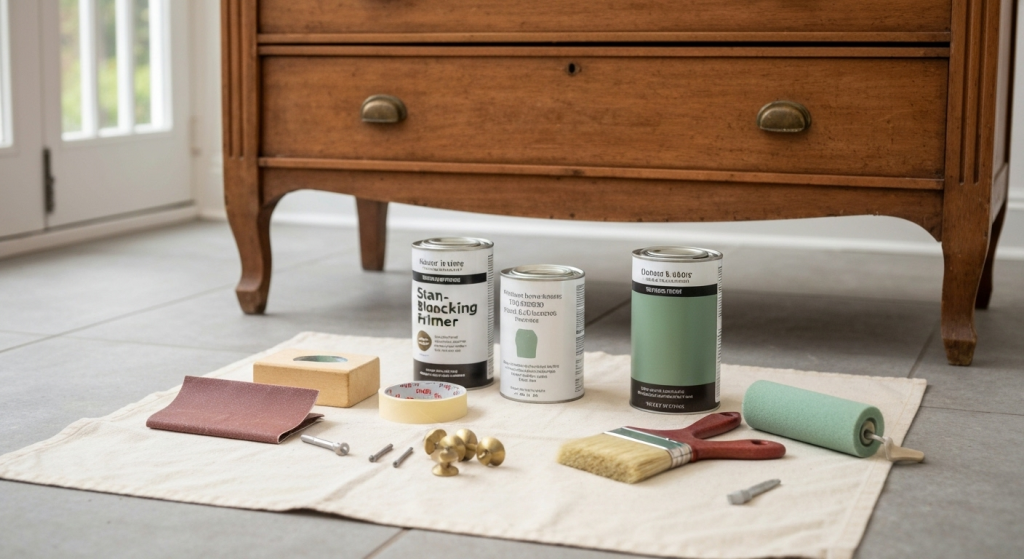
Your No-Power-Tool Toolkit
You don’t need a workshop full of expensive tools to achieve amazing results. Here’s a list of essentials you can find at any hardware or home improvement store.
- Cleaning Supplies: A good degreasing cleaner (like TSP substitute or a simple mix of dish soap and warm water), sponges, and clean rags.
- Sanding Supplies: A pack of medium-grit (120-150) and fine-grit (220) sandpaper. A sanding block can make it more comfortable to hold.
- Painter’s Tape: For creating clean lines and protecting areas you don’t want to paint.
- Drop Cloth: An old sheet or a plastic tarp to protect your floors.
- Primer: A high-quality, stain-blocking primer. This is a non-negotiable step for a lasting finish.
- Paint: Your chosen color in a suitable furniture paint formula (more on this next).
- Brushes and Rollers: A couple of high-quality synthetic-bristle brushes for cutting in and a small foam roller for large flat surfaces to get a smooth finish.
- Screwdriver: A simple Phillips head and flathead screwdriver to remove hardware.
- New Hardware (Optional): Knobs, pulls, or handles.
- Peel-and-Stick Wallpaper (Optional): A fun and easy way to add pattern.
- Craft Knife: For trimming wallpaper precisely.
- Protective Topcoat: A clear water-based polyurethane or polycrylic in your desired sheen (matte, satin, or semi-gloss).
Project 1: The Transformative Power of Paint
Paint is the heart and soul of most furniture makeovers. It has the power to completely change the mood and style of a piece, taking it from dark and heavy to light and modern.
Selecting the Perfect Paint
Walking down the paint aisle can be overwhelming. Let’s simplify it. For furniture, you have a few excellent, beginner-friendly options.
| Paint Type | Best For | Pros | Cons |
| Chalk Paint | A rustic, matte, or distressed look. | Requires minimal to no sanding or priming. Adheres to almost any surface. Very forgiving. | Can be expensive. Requires a wax or polycrylic topcoat to be durable. |
| Milk Paint | A genuinely aged or chippy vintage look. | Non-toxic and environmentally friendly. Creates an authentic, time-worn finish. | Can be unpredictable in how it chips. Usually comes in a powder you have to mix. |
| Latex (Wall) Paint | A budget-friendly, modern finish in any color imaginable. | Inexpensive and available everywhere. Can be tinted to any color. Easy water cleanup. | Requires proper priming and sanding. Less durable than other furniture paints without a topcoat. |
| Acrylic Enamel | A hard, durable, modern finish. Often labeled as “cabinet and trim” paint. | Cures to a very hard, scrubbable finish. Self-leveling properties help reduce brush strokes. | Can be trickier to work with as it dries quickly. Stronger odor than latex. |
For a first-timer aiming for a clean, modern look, a good quality acrylic enamel is a fantastic choice. It combines durability with a smooth finish.
Your Step-by-Step Painting Guide
Let’s break down the painting process into simple, manageable steps. Patience here is key.
- Prep is Everything: Start by removing all hardware (knobs and pulls). Give the entire piece a thorough cleaning with your degreasing solution to remove years of dust, grime, and oils. Let it dry completely.
- The Light Sand: You don’t need to strip the old finish off entirely. The goal is to “scuff sand” the surface. Go over the whole piece with your medium-grit sandpaper just enough to remove the shine. This gives the new primer and paint something to grip onto. Wipe away all the sanding dust with a damp cloth.
- Time to Prime: Apply a thin, even coat of stain-blocking primer. I learned this the hard way on an old mahogany table; without a good primer, the reddish tannins from the wood bled through my beautiful light gray paint, creating pinkish splotches. Primer prevents this and ensures your final color is true. Let it dry according to the can’s instructions.
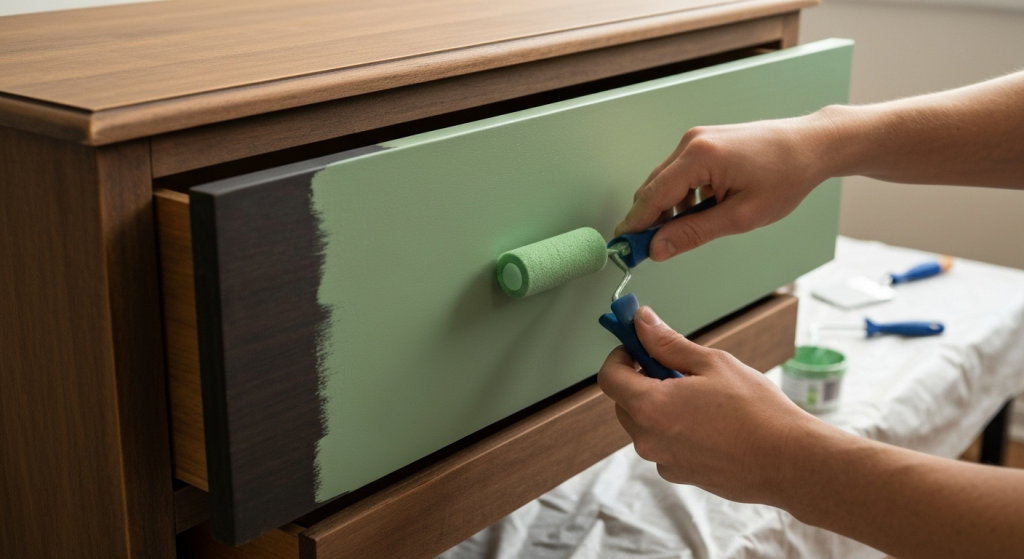
- Apply the First Coat of Paint: Using your brush for the corners and details and your foam roller for flat surfaces, apply a thin, even coat of your chosen paint. Don’t try to get full coverage in one go. A thick coat will lead to drips and a longer drying time.
- Sand Lightly (Again!): Once the first coat is completely dry, give it a very gentle sanding with your fine-grit sandpaper. This smooths out any minor imperfections and creates a glassy-smooth surface for the next coat. Wipe away the dust.
- The Final Coat: Apply your second coat of paint, again keeping it thin and even. This coat should give you full, beautiful coverage.
- Seal the Deal: Even if you use durable paint, a topcoat is your insurance policy. It protects the finish from scuffs, scratches, and water rings. Apply 2-3 thin coats of a water-based polycrylic, letting it dry and lightly sanding between coats as recommended on the can.
Project 2: The Easiest Upgrade: Swapping Out Hardware
Never underestimate the impact of new hardware. It’s like jewelry for your furniture. Swapping out old, dated brass pulls for sleek, modern black or brushed gold knobs can instantly update a piece, even without painting it. This is a five-minute project with a huge payoff.
How to Choose New Hardware
- Measure First: Before you buy, measure the distance between the screw holes on your existing pulls. This is called the “center-to-center” measurement. Buying new pulls with the same measurement means you won’t have to drill new holes. If you’re swapping pulls for knobs, you’ll just have one hole to work with.
- Consider the Style: Think about the look you want. Do you want modern and minimalist (long, simple bar pulls), rustic and charming (cast iron knobs), or glamorous and chic (brushed brass or crystal knobs)?
- Think About Finish: The finish of your hardware should complement your paint color. Black, chrome, and brushed nickel look great with cool colors like blues and grays, while brass, gold, and copper pair beautifully with warm colors and jewel tones.
The process is as simple as it gets: just use your screwdriver to remove the old screws from inside the drawer, take off the old hardware, and screw the new hardware into place. It’s the most satisfyingly simple step in any makeover.
Project 3: A Pop of Personality with Peel-and-Stick Wallpaper
Peel-and-stick wallpaper isn’t just for walls. It’s a fantastic, low-commitment way to add a pop of pattern and personality to furniture. It’s completely removable, so if you change your mind later, you can easily swap it out.
Creative Places to Use Wallpaper
- Drawer Fronts: This creates a bold statement and is perfect for a simple, flat-front dresser.
- The Inside Back of a Bookshelf or Hutch: This adds a surprise element of color and pattern that elevates the whole piece.
- The Sides of Drawers: A secret detail that you see every time you open a drawer. It feels custom and high-end.
- On Top of a Side Table: Cover the top surface and protect it with a topcoat or a custom-cut piece of glass for a durable, stylish finish.
Application Made Easy: The No-Bubble Method
- Clean the Surface: Make sure the area is clean and dry.
- Measure and Cut: Measure the area you want to cover and cut the wallpaper with your craft knife, leaving about an extra inch on all sides.
- Peel and Stick: Peel back just a few inches of the paper backing from the top. Line it up carefully on your surface.
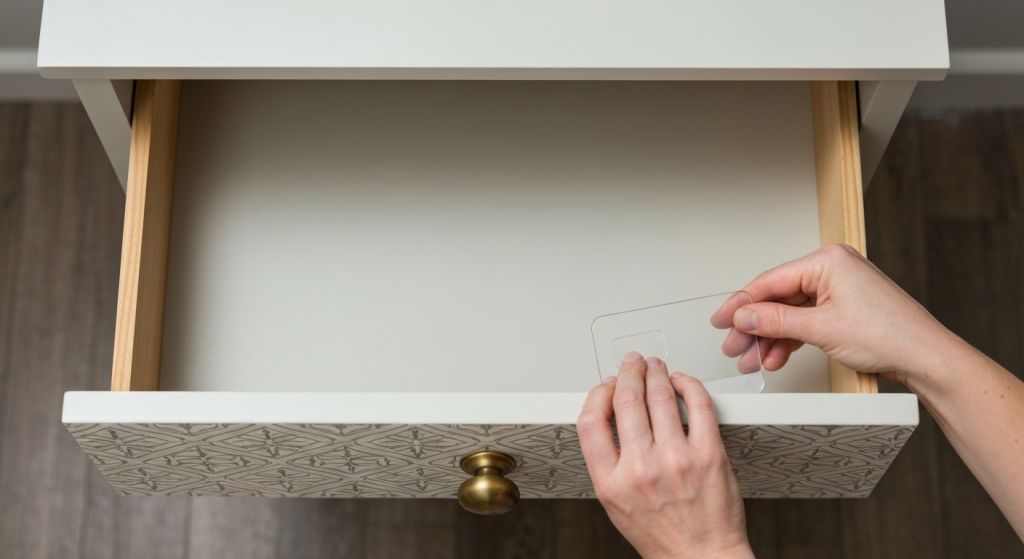
- Smooth It Out: Using a credit card or a plastic squeegee, slowly press the wallpaper onto the surface, working from the center out to push out any air bubbles. Continue to pull the backing off little by little as you smooth.
- Trim the Excess: Once the entire surface is covered, use your sharp craft knife to carefully trim away the excess paper for a perfect fit.
Common Beginner Mistakes (And How to Easily Fix Them)
Over the years, I’ve made just about every mistake you can make. Learning from them is part of the process! Here are the most common pitfalls and how you can sidestep them.
| Common Mistake | The Unfortunate Result | The Simple Fix |
| Skipping Prep Work | The paint easily chips, scratches, or peels off because it has nothing to adhere to. | There’s no great fix after the fact. The best solution is to strip or sand it all off and start again, this time with proper cleaning and sanding. |
| Applying Paint Too Thickly | Ugly drips and runs form on vertical surfaces, and the paint takes forever to cure properly. | If the paint is still wet, you can smooth it out with your brush. If it’s dry, you’ll need to sand the drip down until it’s smooth and then apply another thin coat of paint. |
| Not Waiting for Paint to Dry | Applying a second coat too soon can pull up the first coat, creating a gummy, messy texture. | Stop immediately. Let the piece dry completely for at least 24 hours, then sand the damaged area smooth before recoating. |
| Forgetting to Seal It | The beautiful new paint job gets scuffed, stained, or damaged by moisture within weeks. | This is an easy fix! Just make sure the paint has fully cured (check the can, but it’s usually 3-7 days), then apply 2-3 thin coats of a polycrylic topcoat. |
Frequently Asked Questions (FAQs)
Can I use these techniques on laminate or veneer furniture?
Yes, but with one crucial extra step. Laminate is a slick, non-porous surface, so you absolutely must use a high-adhesion shellac-based primer. This type of primer is designed to stick to glossy surfaces and will create a bond for your paint to grab onto.
What is the most beginner-friendly paint to use?
Chalk paint is often considered the easiest for absolute beginners because it requires very little prep work (often no sanding or priming). However, for a more durable, modern finish, a quality acrylic enamel paint is also a great choice if you follow the prep steps correctly.
Do I really need to sand the furniture before painting?
Yes, even if it’s just a light scuff sanding. Think of it like this: trying to paint a glossy surface is like trying to write on glass with a pencil. Scuff sanding creates microscopic grooves that give the primer and paint a rough surface to grip, ensuring a long-lasting finish.
How long does it take for the paint to fully cure?
Paint might feel dry to the touch in a few hours, but it isn’t fully hardened, or “cured.” Curing is the chemical process where the paint becomes its most durable. This can take anywhere from a week to 30 days, depending on the paint type and environment. Be gentle with your newly painted piece during this time.
Conclusion: Your New Furniture Awaits
That outdated piece of furniture sitting in your home isn’t a lost cause; it’s an opportunity. With a bit of creativity and a few simple supplies, you can transform it into something you truly love. Upcycling is more than a budget-friendly decorating trick; it’s a way to reduce waste, express your style, and gain the satisfaction of making something beautiful with your own hands. You don’t need a garage full of tools or years of experience. All you need is a willingness to try. So go ahead, pick a project, and give that old furniture the modern makeover it deserves.