Your hobbies are a huge part of who you are. They bring you joy, help you unwind, and allow you to create something beautiful. But let’s be honest: they can also bring a lot of stuff. That collection of yarn, the family of guitars leaning in a corner, or the ever-growing stack of canvases can quickly turn a peaceful space into a cluttered one. The big question is, how do you celebrate your passion within your home without letting it take over? How do you make your hobby a seamless part of your decor instead of a source of mess?
My name is William Johnson, and for years, I’ve been exploring the world of home decor, driven by a deep curiosity about how our spaces can truly reflect us. I’m not an interior designer with a fancy degree, but I’ve spent countless hours helping friends and family, and writing about how to make a home feel both beautiful and deeply personal. My passion is finding that sweet spot where function and style meet. I believe our homes should tell our stories, and that includes the passions we pour our hearts into, without sacrificing peace and order.
The secret isn’t about hiding your hobby away in bins and closets. It’s about a mindset shift. You need to start seeing your hobby supplies not as clutter, but as potential decorative elements. Your guitar has beautiful curves. Your yarn collection is a rainbow of textures. Your photographs are windows into your world. This guide will walk you through practical, stylish ways to integrate your specific hobby into your home, turning potential messes into meaningful displays.
The First Step: Shifting from Storage to Showcase
Before we get into specific items, we need to talk about the core idea: changing how you view your hobby gear. Most people default to thinking about “storage,” which often means “hiding.” We buy plastic bins and shove them under the bed or into a closet. While necessary for some things, this approach separates your passion from your daily life.
The goal is to move from a mindset of storage to one of showcasing.
What this really means is being intentional. Instead of asking, “Where can I hide this?” ask, “How can I display this beautifully?” This simple change in perspective opens up a world of creative possibilities. It’s the difference between a pile of books on the floor and a thoughtfully stacked arrangement on an end table that acts as a pedestal for a small plant. Same items, completely different feeling.
Key Principles of a Showcase Mindset
- Curate, Don’t Hoard: You don’t need to display every single paintbrush or skein of yarn. Choose your favorites—the most beautiful colors, the most interesting tools, the projects you’re proudest of. The rest can be kept in organized, accessible (but not necessarily visible) storage.
- Create “Zones”: Designate a specific area for your hobby. This doesn’t have to be a whole room. It could be a corner of your living room, a section of a wall, or a dedicated bookshelf. This contains the items and makes them feel like a purposeful installation rather than a random spillover.
- Function Meets Form: The best solutions are both beautiful and practical. If you have to unstack ten boxes to get to your camera, you’re less likely to use it. Your display should keep your most-used items within easy reach.
For the Crafter and Artisan: A Symphony of Supplies
Crafting hobbies, from knitting to painting, often come with a multitude of small, colorful items. This can be a recipe for chaos, but it’s also a fantastic opportunity to play with color and texture in your decor.
The Elevated Pegboard
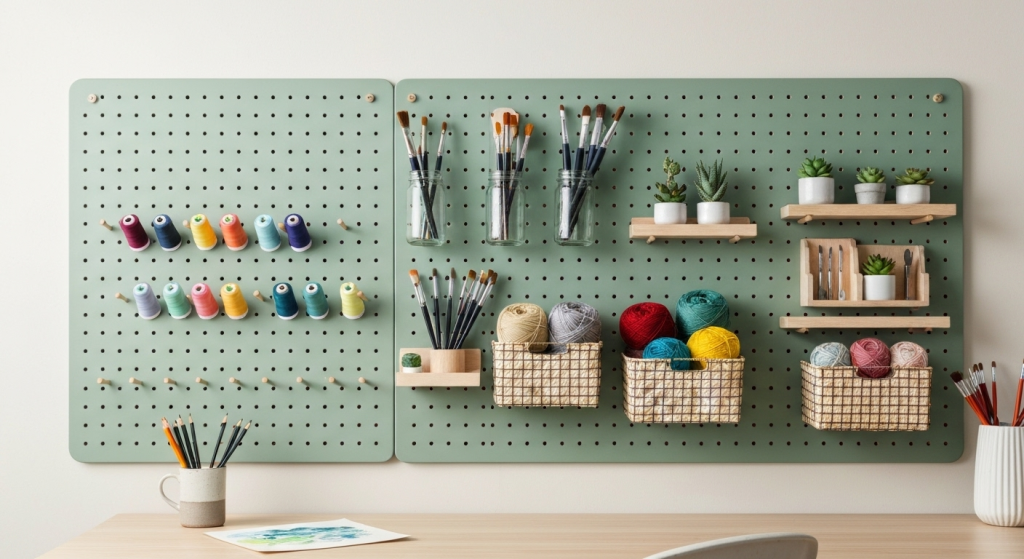
Pegboards have escaped the garage and are now a staple of stylish and functional interiors. They are incredibly versatile and can be customized to fit any aesthetic. A plain brown pegboard can feel utilitarian, but with a little effort, it becomes a dynamic piece of wall art.
I once worked on a small apartment where a jewelry maker had beads, wires, and tools spilling out of dozens of small containers. We installed a large pegboard, painted it a deep charcoal to match an accent wall, and added a mix of shelves, hooks, and small baskets. Her pliers and tools were hung in an organized pattern, and her most vibrant beads were placed in clear, wall-mounted containers. It immediately transformed the look of her workspace from chaotic to chic and professional.
How to Make it Work:
- Paint it: Match the pegboard to your wall color for a subtle, built-in look, or choose a bold, contrasting color to make it a statement piece.
- Frame it: Adding a simple wood frame around the pegboard instantly makes it look more finished and intentional, like a piece of art.
- Mix and Match Accessories: Use a combination of hooks, shelves, small buckets, and magnetic strips to hold different supplies. Arrange them in a way that is visually balanced and easy to use.
| Display Method | Pros | Cons | Best For |
| Pegboard | Highly customizable, keeps items visible and accessible, space-saving. | Can look cluttered if not arranged well, requires drilling into walls. | Tools, threads, paints, and other small-to-medium supplies. |
| Glass Jars | Aesthetically pleasing, protects items from dust, easy to see contents. | Can take up shelf/counter space, risk of breakage. | Buttons, beads, pigments, small skeins of yarn. |
| Open Shelving | Versatile, can hold larger items, allows for creative arrangements. | Requires frequent dusting, can look messy without organized containers. | Yarn, fabric bolts, finished projects, larger art supplies. |
The Yarn and Fabric Library
For knitters, weavers, and sewists, your primary material is often beautiful in its own right. A collection of yarn or fabric is a feast of color and texture. Instead of hiding it in bags, think of it as your personal library of creative potential.
A simple cube shelving unit (like the famous IKEA KALLAX) is perfect for this. Arrange your yarn or neatly folded fabric bundles by color to create a stunning gradient effect. This turns a wall into a massive, touchable art piece that is also your supply closet. It keeps everything visible, inspiring you to start your next project while adding a huge dose of warmth and personality to the room.
For the Musician: Instruments as Sculptural Art
Musical instruments are often crafted with as much attention to form as to function. The elegant curve of a cello, the classic shape of a Stratocaster, or the gleaming brass of a trumpet are all inherently beautiful. Leaving them in cases on the floor not only clutters the room but also hides their artistry.
Wall Mounts: Your In-Home Gallery
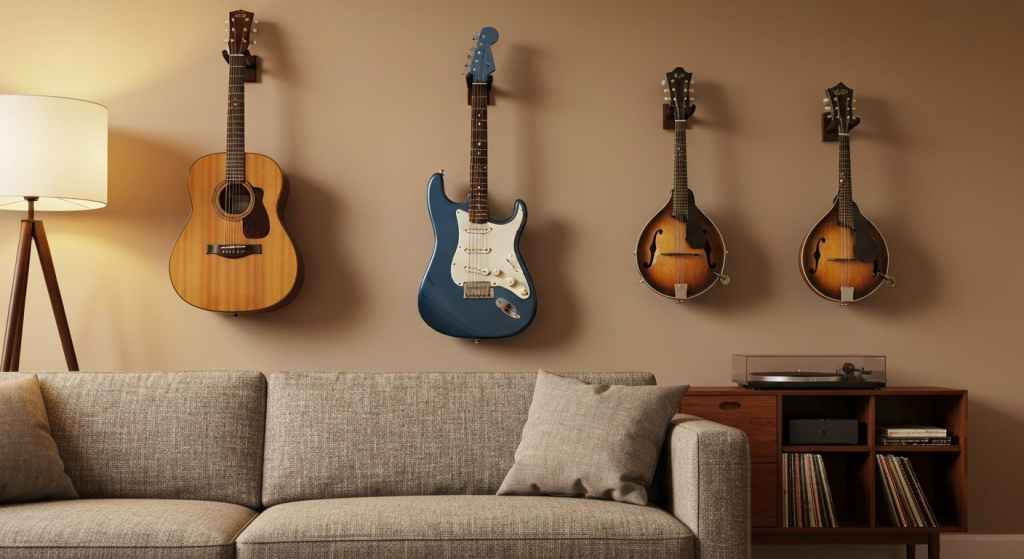
The easiest and most impactful way to integrate instruments into your decor is with high-quality wall mounts. A guitar hanging on the wall is no longer just a guitar; it’s a piece of three-dimensional art.
Here’s the thing, arrangement is key. Don’t just stick them on the wall randomly.
- Consider Symmetry and Balance: If you have multiple instruments, arrange them symmetrically or in a way that balances the visual weight in the room. Three guitars hung in a neat row look more intentional than three scattered across a wall.
- Create a “Music Zone”: Hang your instruments above your record player, amp, or a small cabinet where you store sheet music and accessories. This creates a cohesive vignette dedicated to your passion for music.
- Lighting Matters: A simple spotlight or picture light aimed at a beautifully mounted instrument can elevate it from a piece of gear to a true centerpiece.
A friend of mine had a collection of vintage ukuleles. We used simple, minimalist wall mounts and hung them in a tight cluster on a small wall in his living room. The mix of different wood tones and shapes created a focal point that was both personal and visually interesting. It became an instant conversation starter for guests.
Smart Storage for Accessories
Amps, pedalboards, and cables are the less glamorous side of making music. However, they can also be integrated thoughtfully.
- Choose Stylish Furniture: Instead of a standard amp stand, place a smaller practice amp on a low-slung credenza or a sturdy side table. This grounds it and makes it feel like part of the furniture arrangement.
- Cable Management: Use cable ties, sleeves, or clips to bundle your cables neatly. Run them along the back of furniture or baseboards to keep them out of sight.
- Dedicated Record Stations: For vinyl lovers, a dedicated record player stand with built-in vinyl storage is a perfect solution. It celebrates the ritual of playing music and keeps your collection organized and accessible.
For the Photographer and Visual Artist: Curate Your Own Work
If you’re a photographer, painter, or illustrator, you are literally creating your own decor. Yet so many artists I know have stacks of canvases leaning against a wall or hard drives full of photos that never see the light of day. It’s time to become the curator of your own in-house gallery.
The Art of the Gallery Wall
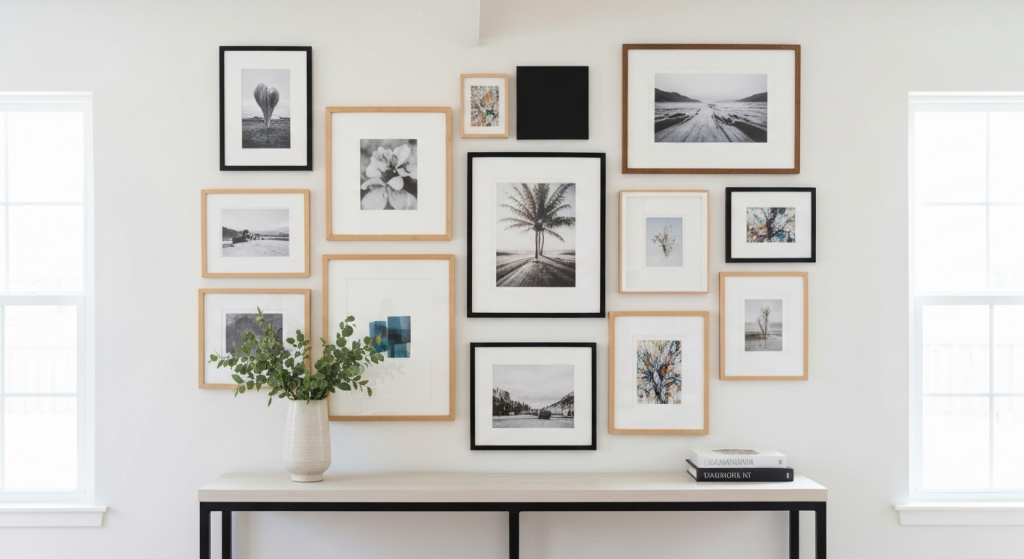
A gallery wall of your own work is the ultimate way to personalize your space. However, a poorly executed one can look random and messy. The key is to make it look curated and professional.
Steps to a Professional-Looking Gallery Wall:
- Choose a Cohesive Theme: This doesn’t mean every piece has to look the same. The theme could be a color palette (e.g., all black-and-white photos), a subject (portraits, landscapes), or a feeling (serene, energetic).
- Invest in Quality Frames: Mismatched, cheap frames can make even the best art look amateurish. You don’t have to spend a fortune, but choosing frames from the same collection or with a similar finish (e.g., all black, all natural wood) will create a unified look. Don’t underestimate the power of a good mat—it gives your work breathing room and makes it look more important.
- Plan Your Layout: Before you hammer a single nail, lay out your framed pieces on the floor. Arrange and rearrange them until you find a composition you love. Take a photo of the final layout to reference as you hang them. Start with the largest piece as your anchor and build the other pieces around it.
- Hang with Precision: Use a measuring tape and a level. The proper spacing (usually 2-3 inches between frames) makes all the difference between a deliberate arrangement and a haphazard one.
Beyond the Wall: Other Display Ideas
- The Art Ledge: A picture ledge is a fantastic, flexible alternative to a traditional gallery wall. It allows you to layer frames of different sizes and easily swap out pieces without putting more holes in the wall. You can mix your art with small objects like plants or candles for added dimension.
- Digital Frames: For photographers with thousands of photos, a high-quality digital frame is a great way to display a rotating gallery of your favorite shots.
- The Portfolio Showcase: If you have a large portfolio or a collection of prints, don’t just leave them in a box. A beautiful, large-format art book on a coffee table, open to a favorite piece, can be an elegant and interactive display.
For the Collector and Book Lover: Intentional Arrangements
Collections—whether of vintage cameras, ceramic birds, or first-edition novels—are born from passion. A collection should be a point of pride, not a source of dust-gathering clutter. The same goes for book lovers whose libraries are threatening to overflow.
The Rule of Three (and Other Curation Tricks)
When displaying a collection, the principle of curation is everything. A pile of 50 teacups is clutter. A group of the three most interesting ones, artfully arranged on a tray, is a beautiful vignette.
- Group in Odd Numbers: Items arranged in groups of three or five are often more visually appealing and dynamic than items in even-numbered groups.
- Vary Height and Texture: When arranging objects on a shelf or table, create visual interest by mixing tall items with short ones, and smooth textures with rough ones.
- Use Risers and Stands: Simple acrylic risers or even a stack of books can be used to elevate certain items in your collection, creating layers and ensuring smaller pieces don’t get lost.
| Problem | Solution | Why It Works |
| Too many books, not enough shelf space. | The “One In, One Out” Rule. For every new book you buy, donate or give away one you’ve already read. | Prevents endless accumulation and forces you to keep only the books you truly love. |
| A collection looks like a random pile of stuff. | Create a “Collector’s Corner.” Dedicate one specific piece of furniture, like a curio cabinet or a set of floating shelves, to your collection. | Containing the collection in one area makes it feel like an intentional exhibit, not clutter. |
| Bookshelves feel boring and uniform. | Break up the books. Alternate vertical stacks of books with horizontal stacks. Use the horizontal stacks as platforms for small decorative objects from your collection. | This adds rhythm and personality, breaking up the monotony of endless spines. |
I helped a friend who collected antique globes. They were scattered all over his house, collecting dust. We gathered them all and placed them on a single, tall étagère bookcase. The larger ones went on the bottom shelves and the smaller ones on top. The result was a stunning tower of history and geography that became the undeniable focal point of his study.
Frequently Asked Questions
What if my hobby supplies are just plain ugly?
This is where clever containment comes in. You don’t have to display everything. For the less-than-beautiful items (like glue guns or spare cables), use attractive storage that fits your decor. Think woven baskets, decorative boxes, or solid-colored bins. The key is to keep these items organized and accessible but out of sight, while your more beautiful supplies get the spotlight.
How do I keep my displayed hobby items from getting dusty?
Dust is inevitable, but it can be managed. For open displays like shelves and pegboards, a regular weekly dusting with a microfiber cloth is your best friend. For more delicate or valuable collections, consider closed storage with glass doors, like a curio cabinet or a barrister’s bookcase. This provides protection while still allowing you to see and enjoy your items.
My space is really small. What’s the best solution for me?
Go vertical! When floor space is limited, your walls are your greatest asset. Use tall, narrow bookshelves, floating shelves, and wall-mounted solutions like pegboards or instrument hangers. This draws the eye upward and keeps the floor clear, making the room feel larger. Multi-functional furniture, like an ottoman with hidden storage, is also a great choice for small spaces.
How often should I rotate my displayed hobby items?
Rotating your displays is a fantastic way to keep your decor feeling fresh and to enjoy more of your collection. There’s no hard rule, but a seasonal rotation is a good starting point. Every few months, swap out some of the displayed items. This not only changes the look of your room but also encourages you to re-engage with different parts of your collection or supply stash.
Your Passion Belongs in Your Home
Integrating your hobbies into your decor is about more than just organization; it’s about celebrating who you are. Your home should be a reflection of your life, your stories, and your passions. By shifting your mindset from hiding your gear to showcasing it with intention, you can create a space that is not only beautiful and clutter-free but also deeply and authentically you. So go ahead, pick up that guitar, pull out that paintbrush, and let your passion become a beautiful part of the place you call home.